03. Bricks and Walls
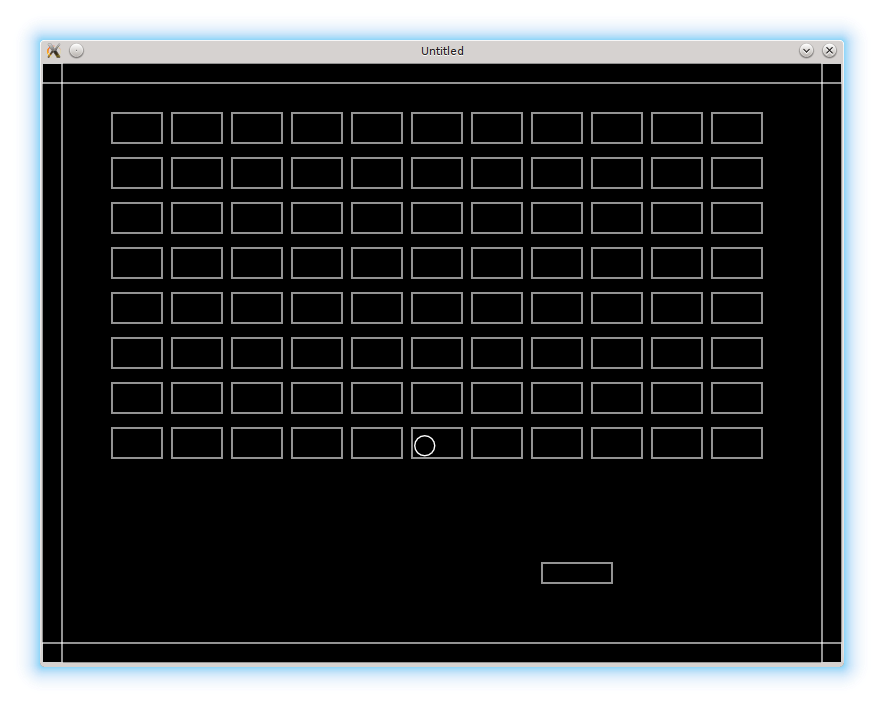
In Arkanoid bricks are arranged in a 2d-pattern. The next step is to add an array of bricks on the screen and walls to the borders.
在 Arkanoid 里,砖块是按二维阵列排列的。下一步就是把一组砖块放到屏幕上,并在边缘加上墙体。
The simplest way to create a 2d-pattern is to define several rows and columns of bricks:
创建二维阵列最简单的方法,就是定义砖块的行数和列数:
bricks.rows = 8
bricks.columns = 11
For each brick we have to provide it's top-left corner position. It can be calculated using it's row and column indices, individual brick's width and height, vertical and horizontal distances between the bricks, and position of the top-left brick relative to the top-left corner of the screen:
每个砖块都需要一个左上角坐标。这个坐标可以根据行列索引、单个砖块的宽高、砖块之间的水平与垂直间距,以及最左上砖块相对屏幕左上角的位置来计算:
local new_brick_position_x = bricks.top_left_position_x +
   ( col - 1 ) *                                           --(*1)
   ( bricks.brick_width + bricks.horizontal_distance )
local new_brick_position_y = bricks.top_left_position_y +
   ( row - 1 ) *                                           --(*1)
   ( bricks.brick_height + bricks.vertical_distance )
(*1): indexing in Lua starts from 1 instead of 0.
(*1):Lua 的索引是从 1 开始,而不是 0。
When actual values for the parameters are provided, it is possible to populate bricks.current_level_bricks by looping over possible values of the row and column indices:
当这些参数有了具体数值之后,就可以通过遍历行列索引来填充 bricks.current_level_bricks:
local bricks = {}
bricks.rows = 8                    --(*1a)
bricks.columns = 11
bricks.top_left_position_x = 70
bricks.top_left_position_y = 50
bricks.brick_width = 50
bricks.brick_height = 30
bricks.horizontal_distance = 10
bricks.vertical_distance = 15      --(*1b)
bricks.current_level_bricks = {}
.....
function bricks.construct_level()
   for row = 1, bricks.rows do
      for col = 1, bricks.columns do
         local new_brick_position_x = bricks.top_left_position_x +   --(*2)
            ( col - 1 ) *
            ( bricks.brick_width + bricks.horizontal_distance )
         local new_brick_position_y = bricks.top_left_position_y +   --(*2)
            ( row - 1 ) *
            ( bricks.brick_height + bricks.vertical_distance )
         local new_brick = bricks.new_brick( new_brick_position_x,   --(*3)
                                             new_brick_position_y )
         bricks.add_to_current_level_bricks( new_brick )             --(*4)
      end
   end
end
(*1a)-(*1b): definition of the properties necessary to compute top left corner position for each brick.
(*2): top left position is computed.
(*3): a new brick is created.
(*4): the new brick is inserted into the bricks table.
(*1a)-(*1b):定义用于计算每个砖块左上角坐标所需的属性。
(*2):计算左上角坐标。
(*3):创建新的砖块。
(*4):把新砖块插入砖块表。
In this part, I also want to add the walls on the borders of the screen. A wall is a rectangle, just like a brick is, so I use a walls table which is similar to bricks in it's structure.
在这一部分里,我还要在屏幕边缘加上墙。墙本质上也是一个矩形,和砖块类似,所以我用一个 walls 表来管理,它的结构和 bricks 很像。
There is a minor difference in walls.new_wall constructor: I do not provide a default width and height for the wall:
walls.new_wall 的构造函数有一个小差别:我不会为墙提供默认的宽高。
function walls.new_wall( position_x, position_y, width, height )
   return( { position_x = position_x,
             position_y = position_y,
             width = width,
             height = height } )
end
In walls.construct_walls, the left, right, top and bottom walls are constructed and then manually inserted into the walls.current_level_walls table:
在 walls.construct_walls 中,会创建左、右、上、下四面墙,然后手动插入 walls.current_level_walls 表:
function walls.construct_walls()
   local left_wall = walls.new_wall(
      0,
      0,
      walls.wall_thickness,
      love.graphics.getHeight()
   )
   local right_wall = walls.new_wall(
      love.graphics.getWidth() - walls.wall_thickness,
      0,
      walls.wall_thickness,
      love.graphics.getHeight()
   )
   local top_wall = walls.new_wall(
      0,
      0,
      love.graphics.getWidth(),
      walls.wall_thickness
   )
   local bottom_wall = walls.new_wall(
      0,
      love.graphics.getHeight() - walls.wall_thickness,
      love.graphics.getWidth(),
      walls.wall_thickness
   )
   walls.current_level_walls["left"] = left_wall
   walls.current_level_walls["right"] = right_wall
   walls.current_level_walls["top"] = top_wall
   walls.current_level_walls["bottom"] = bottom_wall
end
Constructors for the walls and the bricks have to be placed in love.load, so the walls and the bricks are created on the start of the game:
砖块和墙的构造函数需要放在 love.load 里,这样游戏一开始就会创建它们:
function love.load()
   bricks.construct_level()
   walls.construct_walls()
end
Finally, the love.update and love.draw functions now look like:
最后,love.update 和 love.draw 就变成这样:
function love.update( dt )
   ball.update( dt )
   platform.update( dt )
   bricks.update( dt )
   walls.update( dt )
end

function love.draw()
   ball.draw()
   platform.draw()
   bricks.draw()
   walls.draw()
end